Prince’s Hot Chicken Shack in Nashville has been serving fiery, cayenne-coated chicken since the 1930s — and that single restaurant sparked a food obsession that’s now everywhere. From food trucks in Los Angeles to chain menus across the country, Nashville hot chicken tenders have become one of the most craved items in American comfort food.
But here’s the thing. Most people order them from restaurants because they think making them at home is complicated. It really isn’t. If you can fry chicken and stir together a spice paste, you’re already 90% there. The trick is understanding why Nashville hot chicken tastes the way it does — that specific combination of heat, sweetness, and crunchy texture that hits differently from regular spicy chicken.
That’s exactly what we’re going to walk through today. You’ll learn how to pick the right cut, nail the brine, get that shatteringly crispy coating, and mix up a hot oil paste that brings genuine Nashville heat to your kitchen. Whether you want mild warmth or face-melting spice, you’ll know how to adjust everything to your liking.
What Makes Nashville Hot Chicken Tenders Different from Regular Spicy Chicken?
A lot of people assume Nashville hot chicken is just fried chicken with hot sauce drizzled on top. That’s not even close.
The real difference comes down to technique. Traditional Nashville hot chicken uses a spiced oil paste — not a sauce — that gets brushed onto the chicken right after frying. This paste is made by mixing cayenne pepper and other spices into the hot frying oil itself. When you brush that fiery oil mixture onto freshly fried chicken, it soaks into the crust just enough to add incredible flavor without making things soggy.
Regular spicy chicken usually gets its heat from one of two places: spices mixed into the breading before frying, or hot sauce poured on afterward. Both approaches work, but neither gives you that distinctive Nashville hot chicken experience — that glossy, dark-red crust with heat that builds slowly and lingers on your tongue.
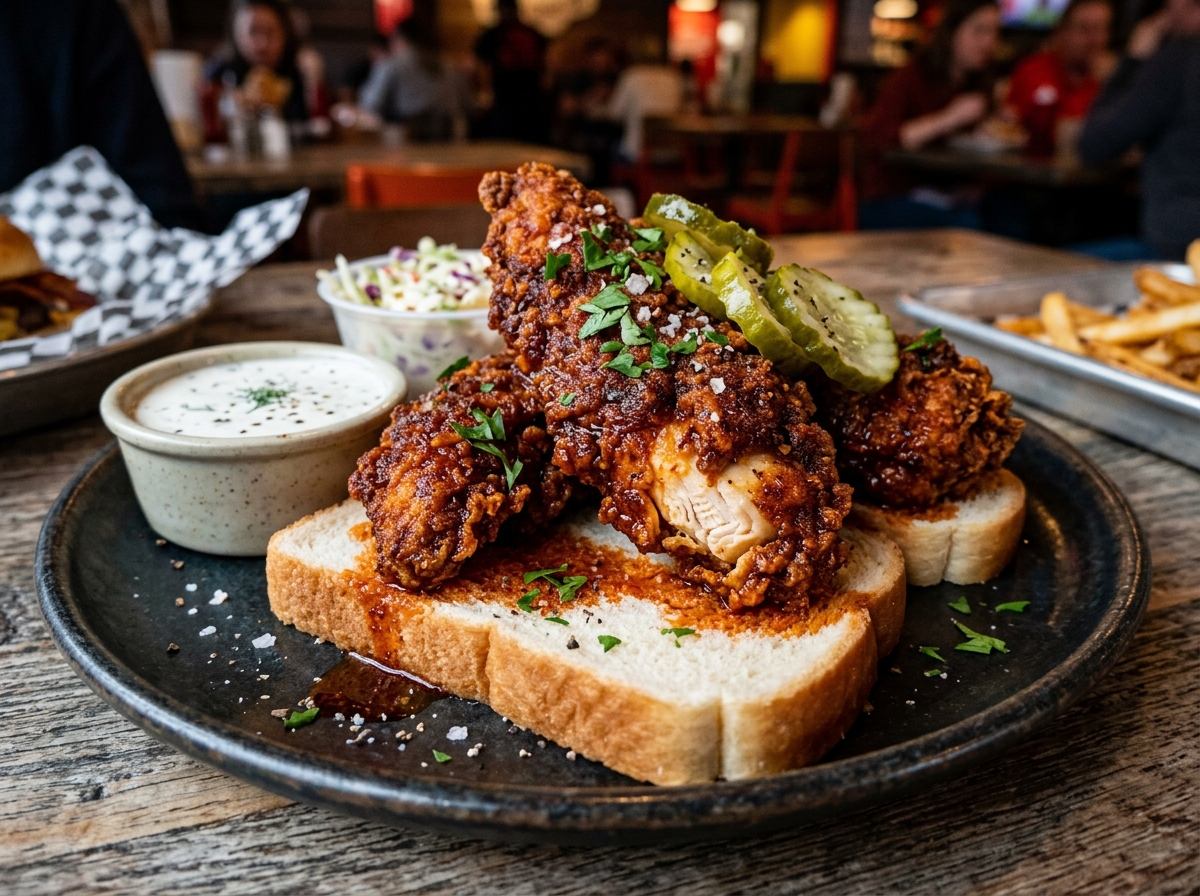
There’s also the serving tradition. Authentic Nashville hot chicken sits on top of white bread slices with pickle chips on the side. The bread catches any dripping spiced oil (you don’t want to waste that), and the pickles give your mouth a cool, tangy break between bites.
If you’ve ever had Nashville hot chicken in its classic bone-in form, tenders follow the exact same flavor profile. The difference is purely about the cut of meat — tenders cook faster, are easier to eat, and make perfect finger food for game day, parties, or a weeknight dinner when you don’t feel like dealing with bone-in pieces.
Choosing the Right Chicken for Your Tenders
You’ve got two options here, and both work well. But they give slightly different results.
Chicken tenderloins are the obvious choice. They’re the small, narrow strips of meat attached to the underside of the breast. They’re naturally tender (hence the name), cook quickly, and have a consistent size that makes frying predictable. If you buy them pre-packaged, you’ll notice a small white tendon running through each one. Take 30 seconds to pull that out with a paper towel — just grip the end and slide it out. Leaving it in makes the meat curl up and get chewy.
Chicken breast cut into strips is your other option. Buy boneless, skinless breasts and slice them lengthwise into strips about ¾ inch thick. Breast meat is slightly denser than tenderloins, so these strips have a meatier bite. They also hold up better to aggressive seasoning and heavy coating.
Pro Tip: Whichever cut you choose, pat the chicken completely dry with paper towels before brining or marinating. Surface moisture is the enemy of crispy coating. The drier the chicken goes into the brine, the better the brine penetrates the meat.
For feeding a group, plan on about 3-4 tenders per person as a main dish, or 2 per person if you’re serving them alongside other food. A pound of chicken tenderloins typically gives you 6-8 pieces, depending on size.
The Brine and Marinade: Where Flavor Starts
Skipping the brine is the single biggest mistake home cooks make with Nashville hot chicken tenders. Dry, bland meat underneath a spicy coating doesn’t fool anyone — the heat just masks disappointment.
A proper brine does two things. It seasons the meat all the way through, not just on the surface. And it changes the protein structure so the chicken stays juicier during frying. Even 2 hours of brining makes a noticeable difference. Overnight is ideal if you can plan ahead.
Buttermilk Brine (The Classic Approach)
Mix together 2 cups of buttermilk, 1 tablespoon of kosher salt, 1 teaspoon of garlic powder, 1 teaspoon of onion powder, ½ teaspoon of smoked paprika, and a few dashes of hot sauce. Submerge your chicken tenders in this mixture, cover the bowl, and refrigerate for at least 2 hours — up to 24 hours.
Buttermilk is mildly acidic, which gently breaks down the outer layer of the meat and helps the coating stick like glue. That’s why nearly every great fried chicken recipe starts here.
Pickle Juice Brine (The Secret Weapon)
This one’s a trick borrowed from a certain famous chicken chain, and it works beautifully with Nashville hot tenders. Use 1 cup of dill pickle juice mixed with 1 cup of buttermilk, plus your salt and spices. The pickle brine adds a subtle tanginess to the meat that plays perfectly against the cayenne heat.
Did you know? The original Nashville hot chicken at Prince’s was supposedly created as revenge. Legend says Thornton Prince’s girlfriend made his fried chicken extra spicy to punish him after a late night out. He loved it so much he opened a restaurant. Whether the story is true or not, it’s become part of Nashville food folklore.
Building the Perfect Crispy Coating
The breading on Nashville hot chicken tenders needs to do two jobs: create a seriously crunchy crust, and provide enough texture for the hot oil paste to cling to. A smooth, thin coating won’t work here — you want craggy, rough, almost shaggy-looking pieces.
The Flour Mixture
In a wide, shallow bowl, whisk together:
- 2 cups all-purpose flour
- 1 tablespoon cayenne pepper (this adds baseline heat to the crust itself)
- 1 tablespoon smoked paprika
- 1 teaspoon garlic powder
- 1 teaspoon onion powder
- 1 teaspoon freshly ground black pepper
- 1 teaspoon salt
- ½ teaspoon white pepper
White pepper might seem like a weird addition, but it adds a sharp, slightly fermented heat that’s different from black pepper. Together, they create a more complex spice profile.
The Double-Dip Technique
Here’s where you build that thick, craggy crust. Take each tender out of the buttermilk brine and let the excess drip off for a second. Press it firmly into the flour mixture, making sure every surface is covered. Now — and this is key — dip it back into the buttermilk briefly, then press it into the flour again.
That second dip creates extra layers and those rough, craggly edges that fry up into the crunchiest bites. Don’t smooth the coating down. Those messy-looking shaggy bits are exactly what you want. They turn into the crispiest parts.
After breading, lay the tenders on a wire rack and let them rest for 15-20 minutes. This resting period lets the coating hydrate and bond with the chicken. Skip this, and your breading will fall off in the fryer. It’s not optional.
Pro Tip: Use one hand for the wet ingredients (buttermilk) and the other hand for the dry ingredients (flour). The moment you mix wet and dry hands together, you end up with clumpy fingers and uneven coating. Keeping them separate sounds basic, but it saves a lot of frustration.
Frying Your Nashville Hot Chicken Tenders
Frying is where patience matters most. Rush this step and you’ll get either undercooked chicken with burnt coating, or properly cooked chicken with pale, soft breading. Neither is acceptable.
Oil Choice and Temperature
Use a neutral oil with a high smoke point. Peanut oil is the traditional choice for Southern fried chicken — it stays stable at high temperatures and adds a subtle richness. Vegetable oil, canola oil, or sunflower oil all work fine too. If you’re looking for guidance on choosing the best oil for frying, the same principles apply here.
Heat your oil to 325°F (163°C). Yes, that’s lower than you might expect. Most fried chicken recipes call for 350°F, but going slightly lower gives the chicken more time to cook through before the exterior burns. Tenders are thin enough that this temperature works perfectly — you get a deep golden crust and fully cooked, juicy meat without any guesswork.
If you don’t own a deep fryer, a heavy-bottomed Dutch oven or cast iron skillet works great. You’ll need about 2-3 inches of oil depth. A clip-on thermometer is your best friend here — oil temperature drops every time you add chicken, so monitor it constantly. If you want to brush up on pan-frying techniques without a deep fryer, that’s a solid skill to have in your back pocket.
Frying Process
Lower the tenders into the oil gently, away from you to avoid splashes. Don’t crowd the pot — fry in batches of 3-4 tenders, depending on your pot size. Overcrowding drops the oil temperature dramatically and leads to greasy, soggy chicken.
Fry for 4-5 minutes per side, turning once. You’re looking for a deep golden-brown color — not light tan, not dark brown. The internal temperature should hit 165°F (74°C) when you check with an instant-read thermometer.
Transfer fried tenders to a wire rack set over a baking sheet. Don’t put them on paper towels — the trapped steam underneath will make the bottom soggy. A wire rack lets air circulate all around, keeping every side crispy.
⚠️ Warning: Hot oil is no joke. Keep kids and pets away from the stove. Have a lid nearby in case of flare-ups. Never use water to put out an oil fire — smother it with a lid or use a fire extinguisher. These are basic precautions, but they’re worth repeating every single time.
The Hot Oil Paste: This Is Where the Magic Happens
You’ve fried beautiful, crispy chicken tenders. Now it’s time to turn them into Nashville hot chicken tenders. The spiced oil paste is what separates Nashville hot chicken from every other type of spicy fried chicken on the planet.
How to Make the Paste
Carefully ladle out about ½ cup of the hot frying oil you just used. Pour it into a heat-safe bowl — a metal or glass bowl, not plastic. Into that hot oil, stir:
- 3 tablespoons cayenne pepper (this is the backbone — adjust up or down based on your heat tolerance)
- 1 tablespoon brown sugar (the sweetness balances the heat and helps create that signature dark glaze)
- 1 teaspoon smoked paprika
- 1 teaspoon garlic powder
- ½ teaspoon chili powder
- ½ teaspoon freshly ground black pepper
Stir this mixture well. It should look like a deep reddish-brown, slightly gritty paste. The hot oil blooms the spices — meaning it activates their essential oils and deepens their flavor. This is exactly why you use hot oil from the fryer, not room-temperature oil from the bottle.
Applying the Paste
Using a pastry brush or the back of a spoon, generously coat each fried tender with the hot oil paste. Don’t be shy. You want a visible coating of that spiced oil on every surface. It’ll soak into the craggy crust and create that classic glossy, dark-red finish.
Work quickly while both the chicken and the paste are still hot. The warmth helps the paste absorb into the breading. If you wait too long and everything cools down, the paste just sits on top instead of melding with the crust.
Heat Levels: Finding Your Sweet Spot
Nashville hot chicken restaurants typically offer several heat levels. Here’s a general guideline for your cayenne amounts in the paste:
Mild: 1 tablespoon cayenne — a gentle warmth, good for people who don’t love spicy food but want to try it.
Medium: 2 tablespoons cayenne — noticeable heat that builds with each bite. Most people find this enjoyable.
Hot: 3 tablespoons cayenne — this is the standard Nashville hot level. Your lips will tingle, your nose might run, and you’ll love it.
Extra Hot / “Shut the Cluck Up”: 4+ tablespoons cayenne, possibly with added habanero powder or ghost pepper powder. Only go here if you genuinely enjoy intense heat. Keep milk or ice cream nearby.
Serving Nashville Hot Chicken Tenders the Right Way
How you serve these tenders matters almost as much as how you make them. The traditional accompaniments aren’t just tradition for the sake of tradition — they serve a real purpose.
White Bread
Place your hot tenders on top of plain white bread slices. Wonder Bread, store-brand white sandwich bread, whatever you’ve got. The bread soaks up the spiced oil that drips down, and eating that oil-soaked bread at the end is one of the best parts of the whole experience. Don’t use fancy artisan bread here — soft, squishy white bread is the correct choice.
Dill Pickles
A pile of dill pickle chips alongside your tenders isn’t optional. The cool, vinegary crunch of pickles cuts through the heat and fat in the most satisfying way. Think of pickles as a reset button for your taste buds between bites. Bread-and-butter pickles work too if you prefer something sweeter.
Coleslaw
Creamy coleslaw is another classic pairing. The cool, crunchy cabbage and creamy dressing calm the heat while adding a textural contrast to the crispy chicken. A simple slaw with mayo, a splash of apple cider vinegar, a pinch of sugar, salt, and shredded cabbage/carrots is all you need.
Other Sides That Work
Mac and cheese is a natural partner — comfort foods and fried chicken go hand in hand. Crinkle-cut fries, crispy golden fries, or waffle fries are another crowd-pleaser. A simple ranch or blue cheese dipping sauce gives people an option to temper the heat.
If you want to turn your tenders into a sandwich, grab some soft brioche buns, stack a couple of tenders on each one with pickles and a drizzle of hot honey on top. That combination of spicy, sweet, and tangy is absolutely ridiculous in the best way — similar to a spicy chicken sandwich but with the Nashville hot treatment.
Common Mistakes That Ruin Nashville Hot Chicken Tenders
After making these dozens of times and watching friends attempt them, I’ve seen the same mistakes come up repeatedly. Avoiding these will save you from mediocre results.
Using hot sauce instead of cayenne paste. Hot sauce is vinegar-based and wet. It’ll make your crust soggy. The whole point of the oil paste is that it’s fat-based — it adds flavor and moisture without destroying the crunch. This is the most fundamental difference between Nashville hot chicken and generic spicy chicken.
Frying at too high a temperature. It’s tempting to crank the heat so things cook faster. But tenders cooked at 375°F+ will have a dark, nearly burnt exterior and a potentially undercooked center. 325°F gives you control and consistency.
Not letting the breaded tenders rest before frying. That 15-20 minute rest after coating isn’t busywork. The flour hydrates and bonds to the buttermilk coating during this time. Without it, your breading separates from the chicken in the oil, leaving you with naked chicken and a bunch of fried flour bits floating around.
Coating your tenders on a plate instead of a wire rack. When breaded tenders sit flat on a plate, the bottom coating gets damp and compressed. A wire rack lets air circulate underneath, keeping the coating intact on all sides.
Adding sugar directly to the coating flour. Some recipes do this, but sugar burns quickly at frying temperatures. Keep the brown sugar in the paste, not the breading. It’ll caramelize slightly when brushed onto the hot chicken without burning.
Can You Bake Nashville Hot Chicken Tenders Instead of Frying?
Yes, but let’s be honest about what you’re getting. Baked tenders won’t have the same crunch or depth of flavor as fried ones. The frying oil does things that an oven simply can’t replicate — it creates rapid, even browning on every surface and contributes to the flavor of the hot paste.
That said, baked tenders can still be really good if you do them right.
Preheat your oven to 425°F. Place breaded tenders on a wire rack over a baking sheet and spray them generously with cooking oil spray on all sides. Bake for 10 minutes, flip them, spray again, and bake for another 8-10 minutes until golden and cooked through.
The coating won’t be as craggy or crunchy as fried tenders, but you’ll still get a decent crunch — especially if you use panko breadcrumbs mixed with your seasoned flour for the coating. Panko’s larger flakes crisp up nicely in the oven.
Apply the hot oil paste exactly the same way you would with fried tenders. The paste is what carries the Nashville hot flavor, so don’t skip or reduce it just because you’re baking.
Air Fryer Nashville Hot Chicken Tenders
Air fryers land somewhere between baking and frying in terms of results. You won’t get the exact same crust as deep frying, but the results are genuinely close — closer than oven baking.
Set your air fryer to 375°F. Spray the basket with oil and place tenders in a single layer without touching. Spray the tops of the tenders with cooking oil. Cook for 5 minutes, flip, spray again, and cook for another 4-5 minutes.
The circulating hot air creates decent browning and crunch. The key is that oil spray — don’t skip it. Without it, the flour coating stays dusty and pale.
Apply the hot oil paste right away after cooking, while the tenders are still piping hot. The paste absorbs best when everything is at maximum temperature.
Storing and Reheating Leftovers (If There Are Any)
Let’s be realistic — Nashville hot chicken tenders rarely have leftovers. But if you do end up with extras, here’s how to handle them.
Store cooled tenders in an airtight container in the refrigerator for up to 3 days. Don’t stack them directly on top of each other — put parchment paper between layers to prevent the coating from getting mushy where they touch.
For reheating, your oven is the best option. Place tenders on a wire rack over a baking sheet and heat at 375°F for 8-10 minutes until heated through and re-crisped. The wire rack is important — it lets hot air hit the bottom too.
Don’t microwave them. The microwave turns crispy coating into a rubbery, sad situation. It takes 30 seconds and destroys 30 minutes of your work. If the oven feels like too much effort, a toaster oven at 375°F for 5-6 minutes works almost as well.
You can make the hot oil paste fresh when reheating. Just warm some neutral oil in a small pan, stir in the spices, and brush it on the reheated tenders. This gives them a freshly-coated taste and appearance.
FAQ
How spicy are Nashville hot chicken tenders compared to Buffalo chicken?
They’re usually spicier. Buffalo chicken gets its heat from cayenne-based hot sauce mixed with butter — the butter mellows the heat quite a bit. Nashville hot chicken uses straight cayenne pepper bloomed in hot oil, which delivers more intense, direct heat. A medium Nashville hot tender is roughly equivalent to the hottest Buffalo wings at most restaurants.
Can I make Nashville hot chicken tenders ahead of time for a party?
You can bread the tenders and refrigerate them on a wire rack for up to 4 hours before frying. Don’t apply the hot oil paste until right before serving — the paste is best when fresh and warm. Fry the tenders, paste them, and serve immediately for the best experience. If you need to hold them warm, keep fried tenders in a 200°F oven on a wire rack for up to 30 minutes before applying the paste.
What can I drink to cool down the heat from Nashville hot chicken?
Milk, buttermilk, or any dairy-based drink works best. Capsaicin — the compound that creates the burning sensation — is fat-soluble, not water-soluble. That means water, beer, and soda will just spread the heat around your mouth without neutralizing it. A cold glass of whole milk or a scoop of vanilla ice cream will genuinely calm the burn. Sweet tea (a Nashville staple) also helps because the sugar provides some relief, even if it doesn’t neutralize capsaicin directly.
Is there a difference between Nashville hot chicken and Nashville hot chicken tenders?
The flavor and preparation method are identical. The only difference is the cut of chicken. Traditional Nashville hot chicken uses bone-in pieces — usually thighs, breasts, legs, and wings. Tenders use boneless chicken tenderloin strips or breast meat cut into strips. Tenders cook faster, are easier to eat by hand, and work better for sandwiches and snacking. The spice paste, breading technique, and serving style stay the same.
What’s the best dipping sauce for Nashville hot chicken tenders?
Ranch dressing is the most popular choice because its cool, creamy flavor counteracts the heat. Blue cheese dressing works for the same reason. Some people swear by a honey mustard dip — the sweetness pairs nicely with the cayenne. And if you actually want to add more heat, a side of the right hot sauce can push things to another level entirely.
Your Next Move
Nashville hot chicken tenders aren’t a restaurant-only food. They’re absolutely something you can pull off in your own kitchen with standard equipment and grocery store ingredients. The whole process — brining, breading, frying, and pasting — takes about 2-3 hours including brine time. The actual cooking is maybe 45 minutes of active work.
Start with a medium heat level your first time. You can always add more cayenne to the paste, but you can’t take it away once it’s on the chicken. Get comfortable with the technique, then adjust the spice to match your personal threshold.
Once you nail these tenders, you’ll have a hard time ordering them from a restaurant again. There’s something deeply satisfying about biting into a shatteringly crispy, perfectly spiced tender that you made yourself — with white bread underneath catching every last drop of that spiced oil. That’s Nashville hot chicken done right.