The difference between a burger that makes people close their eyes mid-bite and one that gets politely finished with extra ketchup? About 10 to 15 degrees Fahrenheit. That’s it. Temperature is the single biggest variable standing between you and a perfectly grilled burger, yet most backyard grillers still guess their way through it.
A reliable burger temperature chart for grilling takes all that guesswork off the table. Whether you like your patty blushing pink in the center or cooked all the way through, hitting the right internal temp means you get the exact texture, juiciness, and flavor you’re after — without risking food safety.
This guide breaks down every doneness level, explains how different meats change the rules, and shares a few grilling techniques that help you actually land on those numbers consistently. Grab your instant-read thermometer and let’s get into it.
Why Internal Temperature Matters More Than Timing
Here’s something most people learn the hard way: grilling burgers by time alone is wildly unreliable. A 6-ounce patty and an 8-ounce patty sitting on the same grate won’t cook at the same pace. Wind, ambient temperature, grill lid position, patty thickness, fat content — all of these shift the timeline. Two identical-looking burgers can be minutes apart in actual doneness.
Internal temperature removes all those variables. It tells you exactly what’s happening inside the meat, which is the only place that actually matters for both safety and taste.
The USDA recommends cooking ground beef to a minimum internal temperature of 160°F (71°C). That recommendation exists because grinding meat exposes more surface area to bacteria like E. coli and Salmonella, which can get mixed into the center of the patty during processing. Unlike a steak, where bacteria mostly live on the surface, a burger carries potential contamination throughout.
Now, does that mean every burger you eat has to be 160°F? Not necessarily. Many restaurants serve burgers at lower temps, especially when they grind meat fresh in-house. But for home cooks working with store-bought ground beef, 160°F is the smart baseline. If you decide to go lower, you’re accepting a calculated risk — and you should at least know exactly what temperature you’re at.
That’s why an accurate thermometer matters more than any grilling timer you’ll ever set on your phone.
The Complete Burger Temperature Chart for Grilling
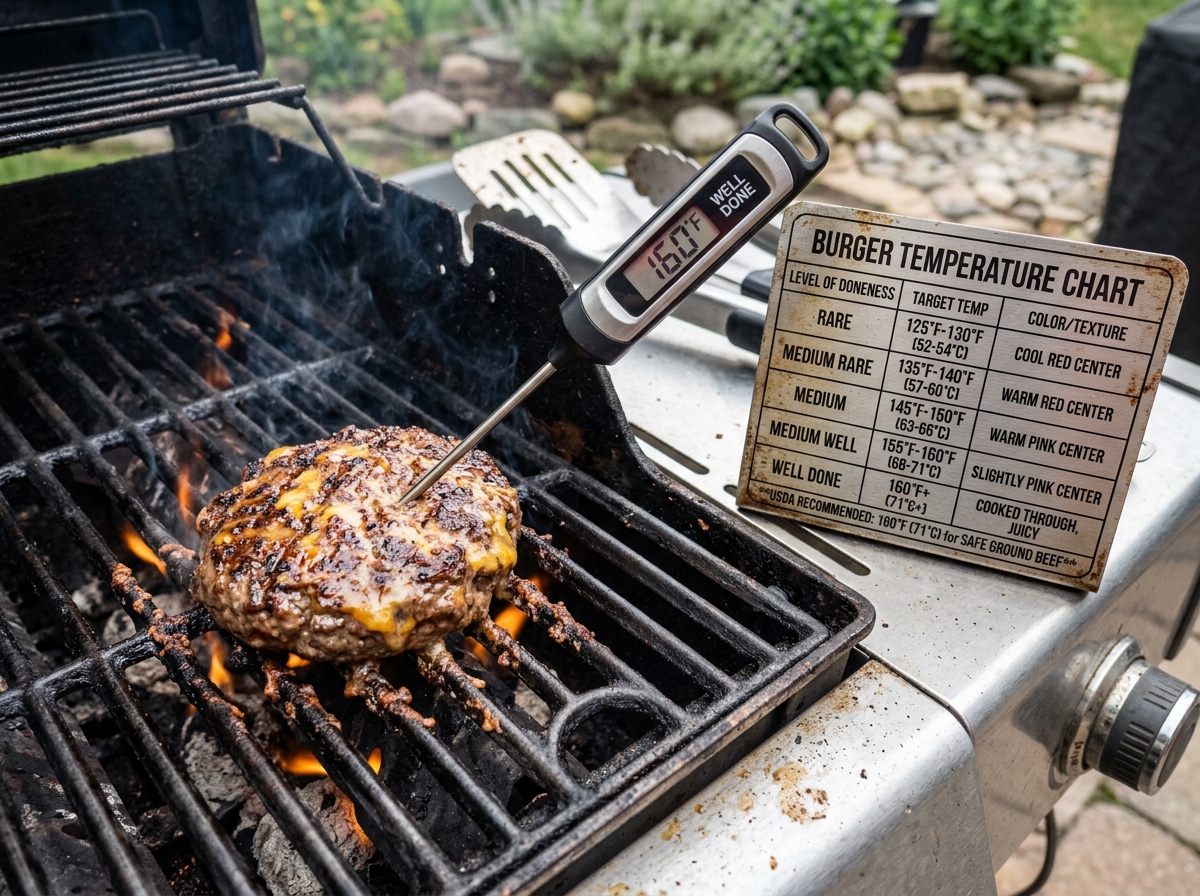
Let’s get to the chart everyone’s searching for. These temperatures apply to beef burgers — we’ll cover turkey, chicken, and plant-based patties separately below.
Rare: 120°F–125°F (49°C–52°C)
The center is cool and red. The texture is very soft, almost mushy. Most health agencies advise against eating ground beef at this temperature because bacteria may not be destroyed. Very few grill cooks aim for this with burgers, and it’s really only seen in high-end restaurants using freshly ground, single-source beef.
Medium-Rare: 130°F–135°F (54°C–57°C)
Warm red center with a softer, juicier bite. This is where burger enthusiasts and many chefs say the magic happens — you get a rich beefy flavor and a texture that practically melts. The food safety risk is real though, so this is a personal choice. If your meat source and freshness give you confidence, some grillers go here.
Medium: 140°F–145°F (60°C–63°C)
Pink center, firmer texture, and still noticeably juicy. This is the sweet spot for a lot of home grillers who want some pink without going too far below USDA recommendations. You still get good flavor and moisture at this range.
Medium-Well: 150°F–155°F (66°C–68°C)
Slight hint of pink, significantly firmer. The burger starts losing more juice here, so fat content in your grind matters a lot. An 80/20 blend holds up much better at medium-well than a 90/10 lean patty, which can turn dry and crumbly.
Well-Done: 160°F+ (71°C+)
No pink at all. This is the USDA-recommended safe temperature for all ground beef. The texture is firm throughout. A lot of people assume well-done means dry, but that’s not inevitable — it just requires the right fat ratio and smart grilling technique. We’ll talk about that shortly.
⚡ Pro Tip: Always pull your burgers off the grill about 3 to 5 degrees before your target temperature. Carryover cooking will push the internal temp up while the patty rests. If you want 160°F, pull at 155°F. This small detail is the difference between hitting your mark and overshooting it.
How Carryover Cooking Affects Your Final Temperature
This is something a lot of home grillers don’t account for, and it’s the hidden reason burgers sometimes end up drier than expected.
When you pull a burger off the grill, the outside of the patty is significantly hotter than the inside. That heat doesn’t just vanish — it continues moving inward. Depending on the patty size and how hot your grill was running, the internal temperature can climb anywhere from 3°F to 7°F after you remove it from the grate.
Think of it this way: the grill is gone, but the residual energy stored in the outer layers keeps doing work. It’s like turning off the shower but still getting warm water for a few seconds.
So if your thermometer reads 160°F when you pull the burger, the center might actually end up at 163°F to 165°F by the time you bite into it. That’s enough to push a medium-well burger firmly into well-done territory — drier, tougher, less flavorful.
The fix is simple. Know your target, subtract 3 to 5 degrees, and pull at that number. Then let the burger rest for 2 to 3 minutes on a clean plate. Resting also lets the juices redistribute, which makes every bite more consistent.
If you’re curious about how total grill time fits into all of this, the breakdown over at how long to grill burgers pairs perfectly with this temperature approach.
Temperature Guidelines for Different Meat Types
Beef gets most of the attention, but plenty of people grill turkey burgers, chicken burgers, and plant-based patties. Each one plays by slightly different rules.
Turkey Burgers
Turkey carries a higher risk of Salmonella than beef, and the meat is leaner, which means less fat to keep things moist. The USDA minimum for ground turkey is 165°F (74°C), and you really don’t want to go below that.
The challenge? Turkey burgers can go from perfectly done to cardboard-dry in a hurry. Because there’s less fat insulating the meat, the temperature climbs faster once you’re in the 150°F+ range. Pull them at 160°F and let carryover do the rest.
A helpful trick is mixing in a tablespoon of olive oil or a bit of grated onion into the turkey mixture before forming patties. It adds moisture that the lean meat desperately needs. For a deeper look at timing and technique, grilling turkey burgers covers the full process.
Chicken Burgers
Same story as turkey — ground chicken needs to reach 165°F (74°C) for safety. Chicken is even leaner than most turkey grinds, so moisture management is critical. Consider using ground chicken thighs instead of breast meat. The extra fat in thigh meat keeps the patty from drying out, and the flavor is noticeably richer.
Plant-Based and Meatless Burgers
Here’s where things get interesting. Brands like Beyond Meat and Impossible Burger don’t carry the same bacterial risks as raw animal protein, but temperature still affects taste and texture dramatically. Most plant-based burger brands recommend cooking to an internal temp of 165°F (74°C) for the best texture and flavor.
Undercook a plant-based patty and it can taste gummy and raw-ish. Overcook it and it dries out just like real meat would. The window is narrow, so a thermometer is just as important here. If you’re exploring this territory, the guide on meatless burger temperatures has some brand-specific tips worth reading.
How to Check Burger Temperature the Right Way
Owning a thermometer is one thing. Using it correctly is another. A surprising number of people stick the probe in wrong and get a misleading reading.
Here’s the proper technique: insert the thermometer probe through the side of the burger, pushing it horizontally toward the center. You want the tip of the probe sitting right in the middle — the thickest, coldest part of the patty. If you go in from the top, you might push through to the grill grate or stop too shallow and read the hotter outer layer instead of the true center.
For thin patties (under half an inch), this gets tricky. Standard probe thermometers can be too thick to get an accurate side-read on a really thin burger. In that case, you can angle the probe at about 45 degrees from the top, but try to keep the tip centered in the meat rather than touching the cooking surface.
What kind of thermometer should you use? An instant-read digital thermometer is your best friend here. They give a reading in 2 to 4 seconds, which means you’re not holding the grill open forever and losing heat. Dial-type thermometers take 15 to 20 seconds and are harder to position accurately in a small burger patty.
Leave-in probe thermometers work great for roasts and briskets, but they’re overkill for burgers. You’d need one probe per patty, and nobody’s doing that for a backyard cookout.
🔑 Quick Fact: According to a 2019 study published in the Journal of Food Protection, visual color alone is an unreliable indicator of burger doneness. Some ground beef patties turn brown well before reaching 160°F, while others stay pink even above that temperature. The color of the meat depends on pH levels, fat content, and even what the animal was fed. Your eyes can fool you — the thermometer won’t.
Grill Temperature vs. Burger Internal Temperature
People sometimes confuse these two, and they’re completely different things.
Grill temperature is how hot the cooking surface or air inside your grill is running. Internal temperature is how hot the center of your burger has gotten. You control the first one. You monitor the second one. They’re related, obviously — a hotter grill cooks the burger faster — but they don’t move in lockstep.
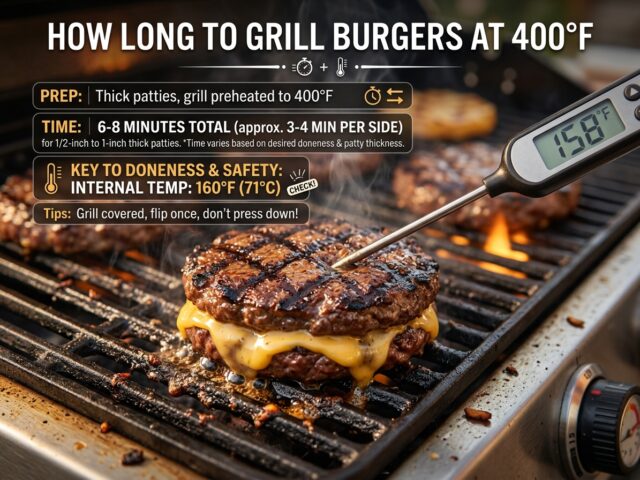
For most burgers, you want your grill running between 375°F and 450°F. That range gives you a nice sear on the outside while allowing the inside to cook through without burning the surface.
If you’re grilling burgers on a gas grill, preheat with all burners on high for 10 to 15 minutes, then dial back to medium-high. For charcoal, let the coals ash over until they glow with a thin white layer, then spread them for even heat.
Running the grill too hot — say 500°F and above — creates a problem. The outside chars and develops a crust before the center has a chance to come up to temperature. You end up with a burger that looks done (maybe even burnt) on the outside but is still raw in the middle. That’s when people cut the burger open to check, lose all the juices, and end up disappointed.
A medium-high grill gives the heat time to penetrate evenly. If you want a stronger sear, you can always use a two-zone setup: one side screaming hot for the initial sear, the other side at lower heat to finish the cook gently.
For the specific 400°F sweet spot, there’s a detailed rundown on grilling burgers at 400°F that walks through timing for different patty sizes.
Adjusting for Patty Thickness and Size
A quarter-pound patty and a half-pound patty don’t just take different amounts of time — they behave differently on the grill.
Thin patties (¼ inch to ½ inch): These cook fast, sometimes in 2 to 3 minutes per side. The margin for error is razor-thin. By the time you think about checking the temperature, a thin patty can already be well-done. For smash burgers and thin patties, high heat and speed are your tools. You’re not really aiming for medium-rare here — these patties are designed to cook through quickly and get a crispy, caramelized crust.
Standard patties (¾ inch to 1 inch): This is the most common thickness for backyard burgers, and it’s the easiest to control. You have enough mass for the interior to develop a gradient of doneness. A ¾-inch patty at medium-high heat needs roughly 4 to 5 minutes per side to reach medium (145°F), but always verify with your thermometer.
Thick pub-style patties (1¼ inches and above): These need patience. If you blast them with high heat the whole time, you’ll char the surface long before the center catches up. A two-zone grill setup works best — sear on high heat for 2 minutes per side, then move to the cooler zone and close the lid. Let indirect heat bring the internal temp up gradually. Check every 2 to 3 minutes.
Did You Know? Making a small thumbprint indentation in the center of your patty before grilling prevents the dreaded “burger ball” effect. As proteins contract over heat, patties tend to puff up in the middle. That dimple counteracts the swelling and helps the burger cook more evenly — which means your thermometer reading at the center is more representative of the whole patty.
What About Frozen Burgers?
Frozen patties are a weeknight reality for a lot of families, and there’s no shame in that. The temperature targets stay the same — 160°F for beef, 165°F for poultry — but the path to get there changes.
You don’t need to thaw frozen burgers before grilling. In fact, going straight from freezer to grill can work really well if you manage the heat properly. Start on medium heat, not high. Frozen patties placed on a screaming-hot grill will burn on the outside while the center is still an ice block.
Cook frozen patties with the lid closed to trap heat and create an oven-like environment. Flip every 3 to 4 minutes to promote even cooking. Total cook time is usually 50% to 75% longer than fresh patties. A frozen ¾-inch beef patty might need 12 to 18 minutes total at medium heat to reach 160°F in the center.
The complete approach is covered in the guide on grilling frozen burgers, including tips on seasoning frozen patties (spoiler: season after the first flip, when the surface is thawed enough for spices to stick).
Pellet Grills and Temperature Precision
If you’re using a pellet grill, you have a built-in advantage: precise temperature control. Most pellet grills let you set a specific cooking temperature and hold it within 5 to 10 degrees. That consistency is hard to achieve on charcoal and even tricky on some gas grills.
For burgers on a pellet grill, set your temperature to 400°F to 425°F. Preheat for at least 15 minutes with the lid closed. Place your patties directly on the grate and smoke for the first few minutes at a lower temp if you want a hint of wood flavor, then crank the heat up to sear and finish.
The one downside of pellet grills is they don’t get as blazing hot as charcoal or high-output gas burners, so the sear can be less intense. Some pellet grill owners do a reverse approach — cook the burgers at 225°F until the internal temp reaches about 120°F, then open the sear plate or crank to max to finish with a hard sear. This gives you edge-to-edge even doneness with a nice crust.
For more detail on this method, cooking hamburgers on a pellet grill walks through the full process step by step.
The Role of Fat Content in Hitting Your Target Temp
Fat doesn’t just affect flavor — it influences how your burger responds to heat.
An 80/20 grind (80% lean, 20% fat) is the gold standard for grilled burgers. That 20% fat does two critical jobs. It bastes the meat from the inside as it renders, keeping the burger juicy even at higher temperatures. And it acts as insulation, slowing down heat penetration slightly and giving you a wider window of time to hit your target.
Leaner grinds — 90/10 or 93/7 — lose moisture much faster. The internal temp can spike quickly once you pass 145°F because there’s less fat buffering the heat transfer. If you’re using lean meat, you almost have to pull earlier and rely more on carryover cooking. Otherwise, the patty goes from done to overdone in less than a minute.
On the flip side, very fatty grinds (75/25 or specialty wagyu blends around 70/30) are more forgiving. They stay moist even if you overshoot by a few degrees. But they also produce a lot more drippings, which can cause flare-ups on the grill. Keep a spray bottle of water handy, or use a drip pan on one zone to manage the grease.
Don’t Forget the Rest Period
This is the step that most people skip, and it makes a bigger difference than you’d expect.
When a burger comes off a 400°F+ grill, the juices inside are hot and agitated. The proteins have contracted, squeezing moisture toward the center and the surface. If you bite in immediately, those juices pour out onto the plate (or down your arm) instead of staying in the meat.
Resting for just 2 to 3 minutes lets the proteins relax slightly and reabsorb some of that liquid. The result is a burger that’s juicier and more evenly moist from edge to center.
You don’t need to tent burgers with foil the way you would a steak or roast. They’re small enough that foil can actually trap too much steam and soften the crust you worked hard to build. Just set them on a clean plate or wire rack and wait. Use that time to toast your buns on the grill — 30 to 45 seconds cut-side down over direct heat gives you a perfect golden toast that also prevents the bun from going soggy.
Pairing Your Perfectly Grilled Burger
You’ve nailed the temperature. The patty is exactly the doneness you wanted. Now what goes with it?
Toppings and sides can make or break the experience. If you’re into building a loaded burger, the right sauce pulls everything together — and there are more options beyond ketchup and mustard than most people realize. Chipotle aioli, smoked salsa, even a well-made guacamole can elevate a grilled burger into something memorable.
On the side, homemade fries are the obvious classic pairing. Getting them crispy without a deep fryer is totally doable if you know the right technique for frying at home. A cast iron skillet with a moderate amount of oil can produce fries that rival any restaurant’s.
FAQ
What temperature should burgers be grilled to for safe eating?
The USDA recommends an internal temperature of 160°F (71°C) for ground beef burgers. For ground turkey and chicken burgers, the safe minimum is 165°F (74°C). These guidelines are designed to eliminate harmful bacteria that can be present throughout ground meat, not just on the surface.
Can you eat a burger at 145°F?
A beef burger at 145°F will have a pink, medium center. While the USDA officially recommends 160°F for ground beef, many restaurants serve burgers at lower temperatures. The risk depends on the freshness and source of your meat. If you choose to eat a burger below 160°F, you’re accepting some food safety risk — especially for children, elderly individuals, pregnant women, or anyone with a compromised immune system.
How do you know when a burger is done without a thermometer?
You can use the touch test — pressing the center of the patty and comparing its firmness to different parts of your hand. A rare burger feels like the fleshy base of your thumb when your hand is relaxed; well-done feels like that same spot when you press your pinky to your thumb. But honestly, this method is imprecise and varies person to person. An instant-read thermometer costs around $10 to $15 and gives you certainty. It’s the best small investment you can make for grilling.
Does the type of grill affect what temperature you should target?
The target internal temperature stays the same regardless of whether you’re using gas, charcoal, or a pellet grill. What changes is how quickly the burger reaches that temperature and how evenly it cooks. Charcoal can run hotter and is harder to regulate, so you need to check temp earlier and more often. Gas gives more control. Pellet grills offer the most precision. But the number on your thermometer — that’s the constant.
Should you flip a burger more than once?
One flip is the traditional advice, and it works fine for most patties. But for thicker burgers (over 1 inch), flipping every 2 to 3 minutes can actually promote more even cooking. The key is to not press down on the patty with your spatula. That squeezes out juices and fat, leaving you with a drier burger regardless of what temperature you pull it at.
Your Next Cookout Starts With a Number
Every great grilled burger starts the same way — not with a fancy rub or a secret sauce, but with knowing your target temperature and having a way to verify it. The chart above gives you the framework. A decent instant-read thermometer gives you the tool. And a little patience — pulling early for carryover, resting before serving — gives you the result.
Pick a doneness level that fits your preference and your comfort level with food safety. Write that number on a sticky note and put it near your grill if you need to. After a few cookouts, it’ll be second nature.
The best burger isn’t the one with the most toppings or the fanciest bun. It’s the one cooked to exactly the temperature you wanted. That’s a burger made with intention — and your guests will taste the difference.