A dry, overcooked burger is probably the most disappointing thing that can come off a grill. You start with good meat, nice buns, fresh toppings — and then you leave those patties on the heat for two minutes too long. Suddenly, you’re chewing through hockey pucks while pretending everything’s fine.
The truth? Grilling a perfect burger isn’t about gut feeling or some vague “flip it when it looks right” advice. It’s about knowing your exact timing, your grill temperature, and what’s happening inside that patty. Whether you want a juicy medium-rare or a fully cooked well-done burger, getting the timing right makes all the difference between “wow, this is incredible” and “pass the ketchup, I need to hide something.”
This guide breaks down exactly how long to grill burgers at every doneness level, on different grill types, and for various patty thicknesses. No guesswork. Just straightforward answers you can use the next time you fire up the grill.
Why Grill Temperature Matters More Than You Think
Before we talk minutes and seconds, let’s get one thing straight — your grill temperature sets the foundation for everything else. You could follow every timing chart perfectly, but if your grill is running too hot or too cool, those numbers won’t mean much.
Most burger grilling happens in the 375°F to 450°F range. That’s your sweet spot. Within this window, you get good sear on the outside while the inside cooks evenly without drying out.
Here’s how temperature affects your cook:
Below 350°F — The burger takes longer to cook, which means more moisture loss. You’ll end up with a gray, steamed patty instead of one with a nice crust. Not ideal.
375°F to 400°F — This is the “sweet zone” for thicker patties (¾ inch and above). The slightly lower heat gives the center time to reach your target temperature while still developing flavor on the surface. If you want specifics on cooking at this temperature, check out this guide on how long to grill burgers at 400°F — it goes deep on timing at that specific heat.
425°F to 450°F — Perfect for standard ½-inch to ¾-inch patties. You get a fast, aggressive sear and shorter cook times. Most backyard grillers land here, and it works great for the classic smash-style or regular thickness burger.
Above 500°F — You’re in steakhouse territory. Great for very thin smash burgers that cook in under 3 minutes, but risky for anything thicker. The outside can burn before the center even gets warm.
Pro Tip: Always preheat your grill for at least 10–15 minutes with the lid closed before placing your patties. An unpreheated grill gives you uneven temperatures and inconsistent results. A properly heated grate also prevents sticking, which means your patties stay intact instead of falling apart mid-flip.
How Long to Grill Burgers at Every Doneness Level
Alright, here’s what you actually came for. These times assume a ¾-inch thick patty (about 6 to 8 ounces) grilled at 400°F to 425°F over direct heat. If your patty is thinner or thicker, adjust accordingly — we’ll cover that in the next section.
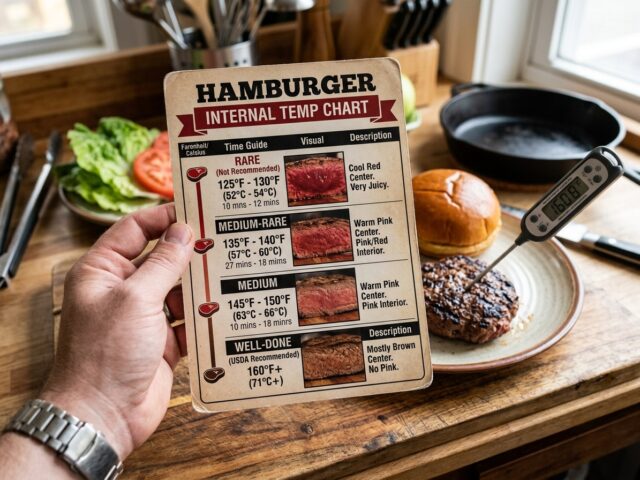
Rare (internal temp: 120°F–125°F): About 2 to 3 minutes per side, so 4 to 6 minutes total. The center will be cool and bright red. Honestly, rare burgers aren’t as popular (or as safe) as rare steaks because ground beef has more surface area where bacteria can hide. But if you’re using freshly ground, high-quality meat and you accept the risk, that’s your call.
Medium-Rare (130°F–135°F): Roughly 3 to 3.5 minutes per side — about 6 to 7 minutes total. You get a warm, red-to-pink center with plenty of juiciness. This is where a lot of burger enthusiasts live. The fat hasn’t fully rendered yet, so the patty stays extremely moist and flavorful.
Medium (140°F–145°F): The most popular doneness level, and for good reason. Grill for about 3.5 to 4 minutes per side, totaling 7 to 8 minutes. The center is pink, warm throughout, and the texture hits that perfect balance — cooked enough to feel safe, juicy enough to enjoy. If you’re unsure what to aim for, medium is your safest bet for both flavor and food safety.
Medium-Well (150°F–155°F): You’re looking at 4 to 4.5 minutes per side, roughly 8 to 9 minutes total. There’s just a hint of pink in the center. The burger is noticeably firmer, and some moisture has been lost compared to medium — but it’s still enjoyable if you don’t overdo it.
Well-Done (160°F+): About 5 minutes per side, 10 minutes total. No pink remaining. The USDA recommends 160°F as the safe internal temperature for ground beef, so if food safety is your top priority — especially for kids, elderly, or pregnant guests — well-done is the way to go. The trick is keeping it from becoming leather, which we’ll talk about below.
For a detailed temperature breakdown that covers all these levels side by side, the burger temperature guide for all doneness levels is a great reference to keep bookmarked.
Quick Fact: The USDA’s 160°F recommendation exists because grinding beef mixes surface bacteria throughout the meat. A whole steak only has bacteria on the outside, which gets killed by searing. Ground beef doesn’t have that luxury — bacteria can be in the center.
How Patty Thickness Changes Everything
Here’s where a lot of grilling guides fail you. They give you one set of times and call it a day. But a ½-inch gas station-style patty and a 1-inch thick pub burger don’t cook the same way. Not even close.
Thin patties (½ inch or less) cook fast. Really fast. You’re looking at 2 to 3 minutes per side for medium, maybe less. These are your smash burgers — the kind where you press a ball of meat onto a screaming-hot flat surface and get those crispy, lacey edges. Thin patties don’t need low-and-slow. They need high heat and quick action. Pull them off even 30 seconds late, and they’re overcooked.
Standard patties (¾ inch) are what most of the timing advice in this article is built around. They’re the classic backyard burger thickness, and they’re forgiving enough to give you a window of about 30 to 45 seconds where the burger stays at your target doneness before overcooking.
Thick patties (1 inch or more) — like the ones you get at a good pub — need a different approach. Straight high heat will char the outside before the middle reaches temperature. The move here is a two-zone setup. Sear the patty over direct high heat for about 2 minutes per side, then move it to the cooler indirect side of the grill to finish. Total cook time for a 1-inch patty to reach medium is around 10 to 12 minutes.
Did you know? A 1-inch patty has roughly 78% more volume than a ¾-inch patty of the same diameter. That extra mass means significantly more time needed for heat to reach the center. This is exactly why using a meat thermometer matters more as your patties get thicker.
Grill Type Makes a Difference Too
Not all grills cook the same. The heat source, airflow, and how your grill retains temperature all play a role. Let’s break it down.
Gas Grills
Gas grills are the most common backyard setup, and they’re great for burgers. You get consistent, controllable heat. Preheat on high for 10 to 15 minutes, then cook your burgers at medium-high (around 400°F to 425°F). The times listed above apply directly to gas grills.
One advantage of gas? Easy two-zone cooking. Just turn one burner to high and leave another on low or off. That gives you a hot side for searing and a cool side for finishing thicker patties. For a step-by-step approach specific to gas grills, the guide to grilling burgers on a gas grill covers the nuances well.
Charcoal Grills
Charcoal grills run hotter (they can easily hit 500°F+), and they add a smoky flavor that gas can’t replicate. The tradeoff? Temperature control is trickier.
With charcoal, your burgers may cook 1 to 2 minutes faster than the times listed above, depending on how hot your coals are. Bank your coals to one side to create a hot zone and a cool zone. Start the burgers over the hot coals, then move them to the cooler side if they’re browning too fast.
Pay closer attention to your meat thermometer on a charcoal grill. The temperature fluctuates more, so visual cues and time alone aren’t as reliable.
Pellet Grills
Pellet grills (like Traeger, Pit Boss, Camp Chef) operate differently from gas and charcoal. They circulate heat like a convection oven, which means more even cooking but a less intense sear.
Burgers on a pellet grill at 400°F to 425°F generally take about the same time as gas — maybe a minute longer per side because the heat isn’t as direct. Some pellet grill owners like to smoke their burgers at 225°F for 30 to 45 minutes first, then crank the temperature up for a finishing sear. It’s slower, but the smoke flavor is worth it if you have the patience.
If pellet grilling is your thing, here’s a detailed breakdown of cooking hamburgers on a pellet grill with specific temperature settings and timing.
The Frozen Burger Question
Let’s be honest — sometimes you don’t have time to thaw. You’ve got a bag of frozen patties and hungry people staring at you. Can you throw frozen burgers straight on the grill?
Yes. You absolutely can. And they turn out better than you’d expect, as long as you adjust.
Frozen burgers take roughly 50% longer to cook than fresh ones. So if a fresh ¾-inch patty needs 7 to 8 minutes for medium, a frozen one will need about 11 to 12 minutes. Start on medium heat (around 350°F to 375°F) rather than high. This gives the center time to thaw and cook through before the outside burns.
A few things to keep in mind with frozen patties: don’t press them down with your spatula (you’ll squeeze out the juice that’s already limited), season them after a minute or two on the grill when the surface thaws enough for the seasoning to stick, and absolutely use a thermometer because guessing doneness on a frozen-to-cooked burger is nearly impossible by touch alone.
There’s a full walkthrough on grilling frozen burgers if you want the complete play-by-play for this specific scenario.
Turkey Burgers Need Their Own Rules
Turkey burgers aren’t just “chicken’s cousin on a bun.” They cook differently from beef because turkey is leaner, dries out faster, and must be cooked to at least 165°F (no medium-rare option here — that’s a food safety line you don’t want to cross with poultry).
A ¾-inch turkey burger patty at 375°F to 400°F needs about 5 to 6 minutes per side, totaling 10 to 12 minutes. The lower fat content means turkey patties go from “juicy” to “cardboard” in a very small window — we’re talking maybe 60 seconds. That’s why a thermometer is even more critical with turkey than with beef.
Here’s a trick that helps: mix a tablespoon of olive oil or a little bit of grated onion into your turkey burger mix before forming patties. The added moisture and fat give you a bigger margin of error and a more forgiving cook.
For specific timing charts and tips tailored to turkey, the turkey burger grilling guide is worth checking out.
Why You Need a Meat Thermometer (Seriously)
I know — “just use a thermometer” sounds like the most boring advice anyone’s ever given about grilling. But hear me out, because this single tool is the difference between nailing your burgers every time and playing a guessing game that you’ll lose more often than you win.
The touch test — pressing the patty and comparing it to the firmness of your palm — works okay for experienced grillers, but it’s unreliable for most people. Patty composition, fat content, how cold the meat was when it hit the grill, ambient temperature, wind — all of these affect how firm a burger feels at a given doneness.
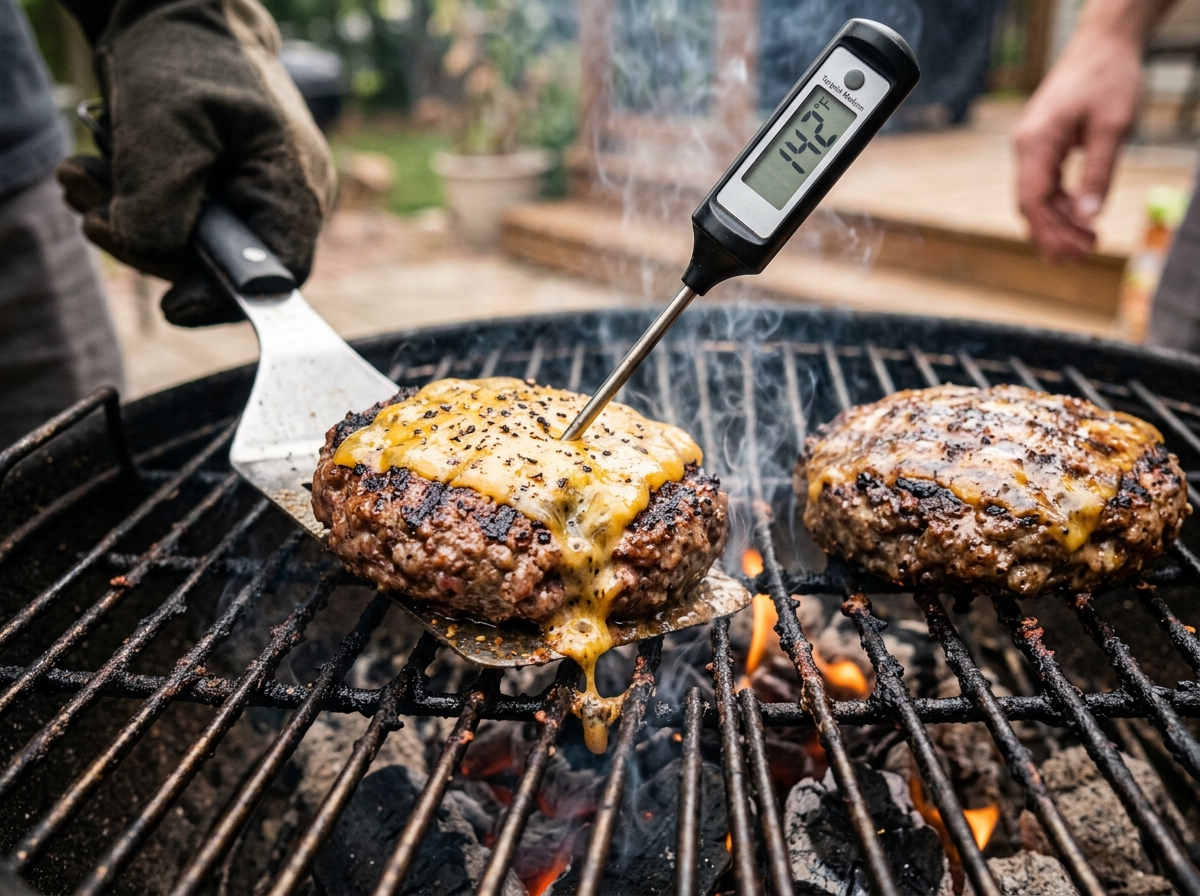
A good instant-read thermometer costs about $15 to $25. Insert it into the side of the patty horizontally, pushing the probe to the center. You get a reading in 2 to 3 seconds. Done.
Important note on carryover cooking: Your burger will rise another 3°F to 5°F after you pull it off the grill. So if you want a finished temperature of 145°F (medium), pull it at 140°F. This is the kind of detail that separates a good burger from a great one.
For a full internal temperature chart for hamburgers, keep that reference handy during your next cookout. It lists every doneness level with exact target temps.
Common Mistakes That Ruin Your Timing
Even with perfect timing knowledge, a few habits can throw everything off. These are the ones I see most often.
Opening the lid too much. Every time you lift that lid, you lose 50°F to 100°F of heat. The grill then needs time to recover, which extends your cook time unpredictably. Open the lid to flip. Open it to check the temperature. That’s it. Resist the urge to peek every 30 seconds.
Pressing the patties with your spatula. That sizzling sound when you smash down on a burger? That’s not the sound of deliciousness — that’s the sound of juice leaving the meat permanently. The only time pressing makes sense is with thin smash burgers right when they first hit the grill. For standard or thick patties, leave them alone.
Starting with cold meat. A patty straight from the fridge is about 38°F in the center. A patty that’s been sitting on the counter for 15 to 20 minutes is closer to 55°F to 60°F. That 20-degree head start means the burger cooks more evenly and reaches your target temperature faster. If you don’t let the meat come to room temperature, the outside overcooks while the center is still catching up.
Not accounting for the grill’s hot spots. Every grill has them. That one spot near the back left that runs hotter than everywhere else? You know the one. Rotate your patties or move them around if you notice uneven browning.
Flipping too often. You need to flip your burger once. Maybe twice if it’s very thick. Constant flipping prevents a good crust from forming, which means less flavor and a longer overall cook. Put the patty down, let it sear for the right amount of time, flip once, and cook the other side.
What About Adding Cheese?
Cheese goes on about 1 minute before the burger comes off the grill. Close the lid so the trapped heat melts the cheese evenly over the top.
The timing here matters because different cheeses melt at different rates. American cheese melts almost instantly — 30 to 45 seconds with the lid down and it’s perfectly draped over the patty. Cheddar and Swiss need the full minute. Thicker slices of pepper jack or blue cheese might need a little longer.
If you put the cheese on too early, it melts completely, runs off the sides, and drips into the flames. Too late, and you’ve got a cold slab sitting on top of a hot burger. One minute before pulling is your safe window for almost every cheese type.
Quick Reference: Burger Grilling Times at a Glance
For a standard ¾-inch patty on a 400°F to 425°F grill:
Rare — 2–3 min per side (4–6 min total) — Internal: 120°F–125°F
Medium-Rare — 3–3.5 min per side (6–7 min total) — Internal: 130°F–135°F
Medium — 3.5–4 min per side (7–8 min total) — Internal: 140°F–145°F
Medium-Well — 4–4.5 min per side (8–9 min total) — Internal: 150°F–155°F
Well-Done — 5 min per side (10 min total) — Internal: 160°F+
These are guidelines, not guarantees. Your actual grill, the meat, the wind, the outdoor temperature — they all nudge these numbers a bit. That’s why the thermometer is your real answer, and these times are your roadmap to get close.
For a printable version of these temps organized by grill type, the burger temperature chart for grilling lays it all out clearly.
The Rest Time Most People Skip
You’ve pulled the burgers off the grill. They look perfect. Everyone’s standing around with plates ready. The temptation to serve immediately is strong.
Resist it for just 3 to 5 minutes.
Resting allows the juices inside the burger to redistribute. When meat cooks, the heat pushes moisture toward the center. If you bite into it immediately, those juices run out onto your plate (or your shirt). A short rest lets them spread back through the patty, so every bite is juicy instead of just the first one.
Set the patties on a clean plate or cutting board. Don’t cover them with foil — burgers are small enough that foil traps steam and softens the crust you worked so hard to create. Just let them sit uncovered. Three minutes is plenty. Five if the patties are thick.
During this rest, the internal temperature will continue climbing by 3°F to 5°F. That’s your carryover cooking at work, and it’s exactly why you should pull burgers off the grill a few degrees below your final target.
FAQ
How do I know when my burger is done without a thermometer?
The touch test can give you a rough idea. Press the center of the patty gently with your finger. If it feels soft and squishy, it’s rare. If it springs back slightly but still has some give, that’s medium. If it’s firm with very little give, you’re at well-done. Honestly though, this method takes a lot of practice to get right, and a $15 instant-read thermometer removes all the guesswork. For a deeper look at what temperature to cook hamburgers and how to gauge doneness, that guide covers visual and touch cues alongside thermometer readings.
Should I grill burgers with the lid open or closed?
For patties ¾ inch or thicker, keep the lid closed. The trapped heat creates an oven-like environment that cooks the burger from all sides, not just the bottom. This means faster, more even cooking. For thin smash burgers (½ inch or less), leave the lid open — they cook so fast that the trapped heat can overcook them before you get a chance to flip.
How often should I flip my burger on the grill?
Once. Put it down, let it cook for the recommended time on the first side, flip it once, and cook the second side. That’s it. Flipping multiple times disrupts the crust formation and can cause the patty to break apart, especially if it’s a looser grind or if you haven’t let the first side sear properly. The only exception is very thick patties (over 1 inch), where a second flip and some time on indirect heat helps even out the cook.
Can I use these same times for plant-based burgers?
Not exactly. Plant-based patties like Beyond Burger or Impossible Burger have different compositions than beef. They generally cook faster — about 3 to 4 minutes per side at 400°F. They also don’t follow the same internal temperature rules since there’s no raw meat bacteria to worry about. You’re cooking them for texture and flavor rather than food safety. Still, most brands recommend an internal temperature of about 165°F for the best texture. For more specifics, there’s a separate guide on meatless burger temperatures that covers the details.
What’s the best ground beef ratio for grilling burgers?
80/20 (80% lean, 20% fat) is the gold standard for grilled burgers. The fat keeps the patty moist during cooking and adds flavor. Leaner blends like 90/10 will dry out much faster on a grill, and you’ll need to shave 1 to 2 minutes off your total cook time to compensate. On the flip side, 70/30 is very forgiving but can cause flare-ups from the extra fat dripping onto the flames.
Your Next Cookout Starts Here
Grilling burgers isn’t rocket science, but it’s also not something you should wing every time and hope for the best. Know your grill temperature. Know your patty thickness. Pull out that thermometer. And remember — you can always cook a burger a little more, but you can never un-cook one.
Start with the times in this guide, adjust based on what your specific grill does, and pay attention to what works. After two or three cooks where you’re checking temperatures and noting your timing, you’ll develop a feel for your particular setup. That’s when grilling burgers stops being stressful and starts being the best part of your weekend.
Now go fire up that grill. Your burgers are waiting.