The CDC estimates roughly 48 million Americans get sick from foodborne illness each year — and undercooked ground beef is one of the most common culprits. That’s not meant to scare you away from burgers. Quite the opposite. Once you understand the right internal temperatures, you can cook a burger that’s both safe to eat and ridiculously juicy.
That’s exactly what this hamburger internal temp chart is built for. Whether you prefer your patties pink in the middle or cooked all the way through, you’ll know the exact number to hit. No guesswork. No dried-out hockey pucks. And no food safety worries keeping you up at night.
Let’s get into the actual temperatures, how to read them accurately, and the practical tips that separate a good burger from one your friends won’t stop talking about.
Why Internal Temperature Matters More Than Cooking Time
Here’s something a lot of home cooks get wrong: they rely on cooking time alone. “Five minutes per side” sounds like a solid rule, right? The problem is that cooking time changes based on a ton of variables — patty thickness, meat fat content, grill or pan temperature, altitude, even how cold the meat was when it hit the heat.
A half-inch patty and a thick, smash-style burger aren’t going to cook at the same rate. A burger straight from the fridge behaves differently from one that sat at room temperature for 20 minutes. Wind blowing across your grill changes things too.
Internal temperature, on the other hand, doesn’t lie. It tells you exactly what’s happening inside the patty. That’s why the USDA, food safety experts, and professional chefs all point to one tool: an instant-read meat thermometer.
Pro Tip: Insert the thermometer horizontally through the side of the patty so the probe reaches the center. Going in from the top often gives you a reading from the surface or the cooking grate below — not the true center temperature.
If you’re already grilling regularly and want to understand how temperature works across different setups, check out this detailed guide on what temperature to cook hamburgers for more context.
The Complete Hamburger Internal Temp Chart
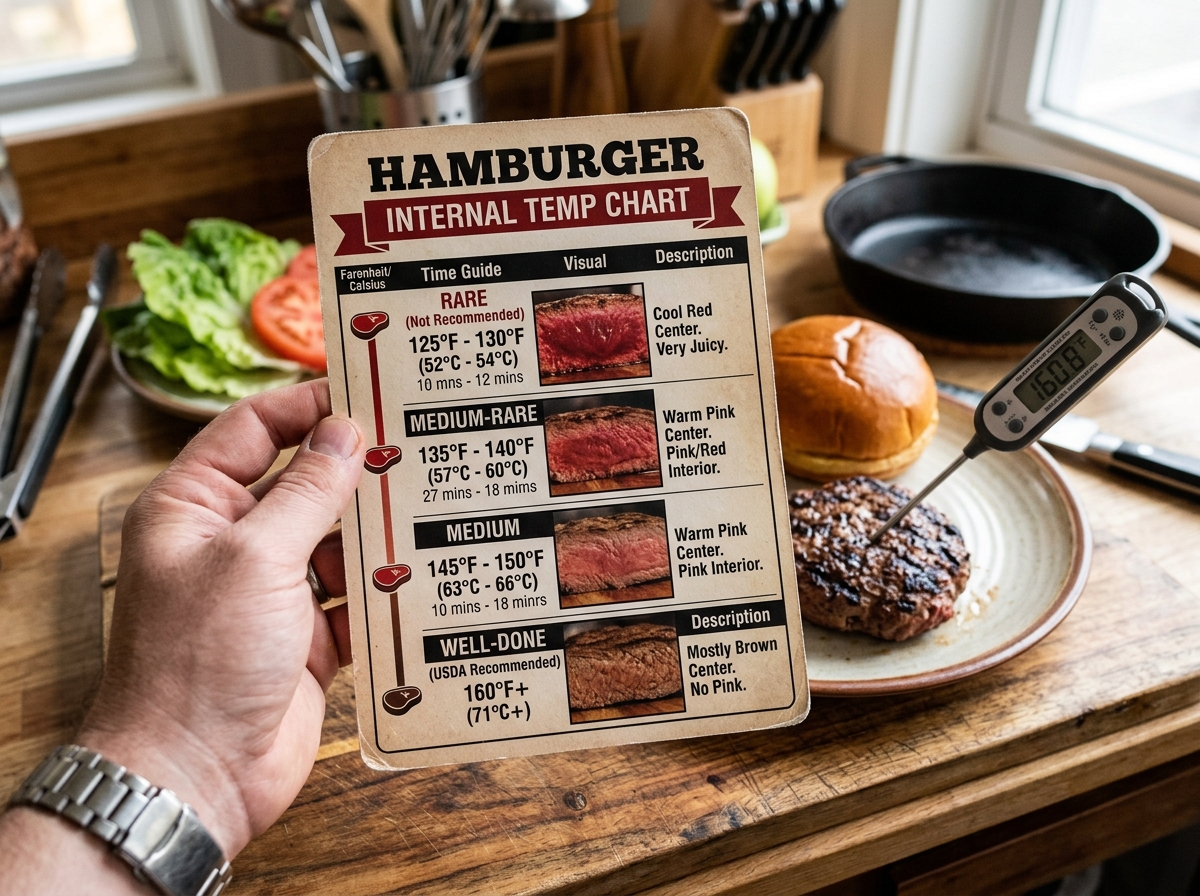
Here’s the chart you came for. These temperatures represent the reading at the thickest part of the patty — the dead center — using an instant-read thermometer.
Rare: 120°F – 125°F (49°C – 52°C)
The center will be cool and bright red. The texture is very soft, almost mushy. Most of the patty outside the center will be pinkish. Rare burgers are not recommended by the USDA for ground beef because the meat hasn’t reached a temperature high enough to kill potential bacteria like E. coli or Salmonella.
Medium-Rare: 130°F – 135°F (54°C – 57°C)
Warm red center with a softer, juicier texture. This is where many burger enthusiasts say the flavor peaks. The fat begins rendering, so you get good flavor without losing moisture. Still below the USDA’s recommended safe minimum for ground beef, though some restaurants serve burgers at this level using high-quality, freshly ground meat.
Medium: 140°F – 145°F (60°C – 63°C)
Pink center that’s warm throughout. This is a popular sweet spot — you get juiciness with a more cooked texture. The USDA recommends 160°F for ground beef, so medium is still technically below that guideline. But many experienced cooks and some chefs consider this an acceptable risk with fresh, high-quality beef.
Medium-Well: 150°F – 155°F (66°C – 68°C)
Slight hint of pink but mostly gray-brown throughout. The patty is firmer, and you’ll notice less juice compared to medium. This level works well for people who don’t want any visible red but still want some tenderness left in the burger.
Well Done: 160°F+ (71°C+)
No pink at all. The patty is fully gray-brown inside with a firm texture. This is the USDA’s official recommended safe internal temperature for all ground beef. The challenge here is keeping the burger from becoming dry — but there are ways to manage that (more on this below).
Did you know? The reason the USDA sets a higher bar for ground beef (160°F) compared to whole cuts like steak (145°F) is because grinding mixes surface bacteria throughout the meat. A steak only has bacteria on the outside, which gets killed by searing. Ground beef has potential bacteria all the way through.
USDA Guidelines vs. What Restaurants Actually Serve
There’s a real gap between what the USDA recommends and what you’ll actually find at most burger restaurants. The USDA says 160°F, period. But walk into any popular burger joint — from a local gastropub to a well-known chain — and you’ll likely see options for medium or even medium-rare burgers on the menu.
How do restaurants get away with this? A few reasons. Many source their beef from trusted suppliers with strict quality controls. Some grind their meat in-house daily, which reduces the risk of bacterial contamination. Others use specific cuts with lower contamination risk.
For home cooks, the situation is a little different. You’re probably buying pre-ground beef from a grocery store, which often contains meat from multiple animals processed at a large facility. The contamination risk is slightly higher than freshly ground, single-source beef.
So what should you do? That’s a personal call. If you’re cooking for young children, elderly family members, pregnant women, or anyone with a compromised immune system, stick with 160°F. The USDA recommendation exists for a reason, and for vulnerable populations, it’s the smartest play.
For healthy adults who understand the risk, many choose to cook to 145°F–150°F for a juicier result. Just know what you’re deciding and why.
For a deeper look at how doneness levels affect flavor and texture across different cooking methods, this burger temperature guide covering all doneness levels breaks things down nicely.
How to Take an Accurate Temperature Reading
Owning a thermometer isn’t enough — you need to use it correctly. Sounds obvious, but you’d be surprised how many people get misleading readings because of simple mistakes.
Pick the right thermometer. Digital instant-read thermometers give you a result in 2–4 seconds. Old-school dial thermometers take 15–20 seconds and are less precise. For burgers, speed matters because you don’t want the patty sitting off the heat for long. Good digital thermometers from brands like ThermoWorks, ThermoPro, or even well-reviewed budget models on Amazon do the job perfectly.
Insert from the side, not the top. This is the single biggest mistake people make. Push the probe horizontally into the thickest part of the patty so the sensor (usually the last half-inch of the tip) sits right in the center. If you go in from the top, your probe might be reading the grill grate temperature or the surface of the patty rather than the core.
Check more than one burger. If you’ve got six patties on the grill, don’t just check one and assume the rest are identical. Patties closer to hot spots will cook faster. Check at least two or three in different positions.
Account for carryover cooking. After you pull a burger off the heat, its internal temperature will rise another 3–5 degrees as residual heat continues to move inward. So if you want a final temp of 145°F, pull the patty off at about 140°F–142°F and let it rest for 3–4 minutes.
Quick Fact: Carryover cooking happens because the outer layers of the patty are significantly hotter than the center. Heat energy keeps flowing inward even after you remove the heat source. Thicker patties experience more carryover than thin ones.
How Doneness Affects Flavor, Texture, and Juiciness
Temperature isn’t just about safety. It has a massive impact on how your burger actually tastes and feels in your mouth. Understanding why helps you pick the doneness level that matches your preference — and avoid disappointment.
Fat rendering is the key. Ground beef typically contains 15–20% fat (in an 80/20 blend, which is the most popular for burgers). As the internal temperature rises, fat melts and either stays within the meat or drips out. At lower temperatures (130°F–140°F), much of the fat stays in the patty, giving you a rich, buttery mouthfeel. At 160°F and above, more fat renders out, which is why well-done burgers often feel drier.
Protein structure changes too. Muscle proteins in beef begin to tighten and squeeze out moisture as temperature increases. Between 140°F and 150°F, the proteins contract moderately — the burger holds together well but stays fairly tender. Above 155°F, proteins contract more aggressively, pushing out juice and creating a firmer, denser texture.
The Maillard reaction (the crust) is separate from internal temp. That beautiful brown sear on the outside? That happens on the surface at around 280°F–330°F — way higher than the internal temperature. So you can absolutely have a burger that’s medium on the inside with a perfectly caramelized crust on the outside. High surface heat plus controlled internal temp is the sweet spot.
This is also why your cooking method matters. If you’re curious about getting the best sear and temperature control on a gas grill, this guide on how to grill burgers on a gas grill walks you through the process step by step.
Adjusting for Different Burger Types
Not all burgers are ground beef. And different proteins hit their safe and ideal temperatures at different points. Here’s how the chart shifts depending on what you’re cooking.
Turkey Burgers
Turkey is poultry, and the USDA recommends all poultry reach 165°F (74°C) internally. There’s no medium or medium-rare option here — turkey needs to be fully cooked. The good news? A well-seasoned turkey burger at 165°F can still be juicy, especially if you mix in some olive oil, grated onion, or a splash of Worcestershire sauce to keep moisture locked in. For specific timing on the grill, here’s a focused piece on how long to grill turkey burgers.
Chicken Burgers
Same rule as turkey — 165°F minimum. Ground chicken has a milder flavor, so seasoning becomes even more important. A dry chicken burger at 175°F is a sad thing. Pull it at 160°F–162°F and let carryover take it to 165°F for the best texture.
Plant-Based / Meatless Burgers
Brands like Beyond Meat and Impossible Burger recommend an internal temperature of about 165°F for best texture and flavor, even though there’s no raw meat safety concern. These patties are designed to mimic the protein and fat behavior of beef at that temperature. Cooking them below 155°F often leaves them mushy and underdeveloped in flavor. If you’re working with meatless options, this article on meatless burger temperatures covers the nuances well.
Pork Burgers
The USDA lowered its recommendation for whole pork cuts to 145°F back in 2011, but ground pork still carries the 160°F recommendation — same logic as ground beef. Bacteria on the surface gets mixed throughout during grinding.
Bison/Venison Burgers
Leaner meats like bison and venison dry out faster because they have less fat. Most experienced cooks aim for 140°F–145°F to keep them edible. Going to 160°F with bison or venison often produces a very tough, dry patty.
Tips to Keep Your Burger Juicy at Higher Temperatures
Let’s say you want (or need) to cook to 160°F for safety reasons. You don’t have to accept a dry burger as your fate. There are real, tested techniques to maintain moisture even at well-done temperatures.
Use 80/20 ground beef. That 20% fat content makes a world of difference. Leaner blends like 90/10 or 93/7 have less fat to keep things moist at higher temps. For well-done burgers, 80/20 is your best friend.
Add a panade. This is a restaurant trick that most home cooks don’t know about. Mix a tablespoon of milk or cream with a small piece of torn white bread until it forms a paste. Fold this into your ground beef before forming patties. The bread and milk mixture traps moisture inside the meat, even at 160°F. It’s the same technique used in meatballs and meatloaf.
Don’t press the patty on the grill. Every time you push down with a spatula, you’re squeezing out fat and juice. Just leave it alone. Flip once, maybe twice. That’s it.
Season the outside, not the inside. Over-mixing salt into ground beef can make proteins bind tighter (it’s the same principle that makes sausage bouncy). Season the outside of formed patties generously with salt and pepper right before cooking.
Rest the burger. Pulling the patty off the grill and immediately biting in means all that liquid inside hasn’t redistributed. Give it 3–4 minutes on a plate or cutting board. The juices settle back into the meat fibers instead of flooding your plate.
How Cooking Method Changes the Game
The temperature chart stays the same no matter how you cook — 145°F is 145°F whether it’s on a gas grill, a pellet smoker, or a cast iron skillet. But the path to getting there differs, and that affects texture and flavor.
Gas grill: Fast, high heat. Great for getting a solid sear. The trick is using two-zone cooking — sear over direct heat, then move to the cooler side to finish gently. If you want detailed timing, here’s a specific breakdown of how long to grill burgers at 400°F.
Charcoal grill: Hotter than gas and adds a smoky flavor. Temperature is harder to control precisely, so a thermometer becomes even more critical.
Pellet grill: Lower, more even heat with consistent smoke. Pellet grills won’t give you as hard a sear unless you crank them up or use a cast iron grate insert. But for flavor, they’re fantastic. For a step-by-step approach, this guide on how to cook hamburgers on a pellet grill is worth reading.
Cast iron skillet (stovetop): Arguably the best sear you can get. The flat surface creates maximum contact between the patty and the hot metal. Great for smash burgers. You can also control temperature very precisely by adjusting the burner.
Frozen patties: Yes, you can grill them straight from frozen. They just take longer, and you need to be extra careful with temperature readings because the exterior can look done while the center is still cold. Here’s a guide specifically for grilling frozen burgers if that’s your situation.
Common Temperature Mistakes That Ruin Burgers
Even with the right chart in front of you, a few common errors can throw everything off.
Cutting the burger open to check. This is the oldest trick in the book, and it’s a bad one. Cutting releases juice and heat, and the color inside isn’t always reliable anyway. Beef color can be affected by pH levels, how the meat was stored, and even what the animal was fed. Use a thermometer instead.
Checking too early or too often. Every time you poke the patty, you create a channel for juice to escape. Check once or twice toward the end of cooking. Not every 30 seconds.
Ignoring carryover cooking. We talked about this earlier, but it’s worth repeating. If your target is 160°F, pull at 155°F. If you want 145°F, pull at 140°F. The temperature will keep rising for a few minutes after the burger leaves the heat.
Using the wrong thermometer placement. Side insertion, center of the patty. Not from the top. Not near the edge. The thickest part of the dead center. This is non-negotiable for an accurate read.
Assuming all patties are the same. Even if you weighed each one at 6 ounces and shaped them identically, grill hot spots mean some will cook faster. Check each one individually if you care about consistency.
For more on dialing in your grill temp and timing, this burger temperature chart for grilling pairs well with the internal temp chart above.
FAQ
What is the safe internal temperature for a hamburger?
The USDA recommends 160°F (71°C) as the safe minimum internal temperature for all ground beef. At this temperature, harmful bacteria like E. coli O157:H7 and Salmonella are destroyed. This applies to burgers made from store-bought ground beef, homemade ground blends, and any other form of ground meat.
Can I eat a burger at 145°F?
Many adults choose to eat burgers cooked to 145°F (medium), accepting a small level of risk. Some restaurants serve burgers at this temperature using freshly ground, high-quality beef. The USDA doesn’t recommend it for ground beef, though. If you’re cooking for children, elderly people, or anyone with a weakened immune system, stick with 160°F.
How do I know my burger is done without a thermometer?
Honestly, you can’t know with certainty. The touch test (pressing the patty and comparing firmness to parts of your hand) gives a rough estimate, but it’s unreliable for food safety. Color isn’t reliable either — a burger can look brown at 140°F or still look pink at 160°F depending on the meat’s chemistry. A digital instant-read thermometer costs as little as $10–$15 and removes all the guessing.
Does the internal temp chart change for stuffed burgers?
The target temperature stays the same, but stuffed burgers (like Lucy burgers with cheese inside) take longer to reach that temperature because the filling insulates the center. You’ll also need to make sure your thermometer probe is reading the meat, not the cheese or other filling, which can give a falsely high reading.
Should I rest my burgers after cooking?
Yes. Resting for 3–4 minutes lets the internal temperature equalize and allows juices to redistribute throughout the meat. If you skip resting, the first bite will be a flood of liquid, and the rest of the burger will taste drier than it should.
Your Next Burger Can Be the Best One Yet
You now have the exact temperatures, the reasoning behind them, and the practical know-how to cook a burger that hits your preferred doneness every single time. Whether you’re team medium-rare or you prefer everything cooked through, the thermometer is your best friend at the grill.
Pick up an instant-read thermometer if you don’t have one. Practice the side-insertion method. Pay attention to carryover cooking. And don’t be afraid to experiment — try one patty at 140°F and another at 155°F on the same cook and taste the difference yourself.
Once you start cooking by temperature instead of time, you’ll never go back to guessing. Your burgers — and the people eating them — deserve that precision.